Holiday of diwali.
Monday, 31 October 2016
Thursday, 27 October 2016
Wednesday, 26 October 2016
Overview
The Alerts Interface exposes directives and events that are used to set, manage and cancel timers and alarms. While AVS sends directives to your client to set and manage timers and alarms, ultimately, your client must implement the logic necessary to manage timers and alarms if internet connectivity is lost or if the on-product clock is out of sync with NTP.
This document covers the following topics:
- Alerts State Diagram
- Alerts Directives and Events
State Diagram
The following diagram illustrates state changes driven by the Alerts component. Boxes represent Alerts states and connectors indicate transitions.
Alerts supports the following states:
IDLE: Prior to a previously set alert going off, the Alerts component should be in the idle state. Alerts should also return to an idle state once an alert is stopped/finished. This can occur as the result of user speech, a physical button press, or GUI affordance.
FOREGROUND ALERT: Assuming an on-client alert has already been set, Alerts should transition from the idle state to the alert foreground state when an alert starts and the AlertStarted event is sent to the Alexa Voice Service.
This is only true if the Alerts channel is in the foreground, which implies the Dialog channel is inactive. For more information on channels and channel prioritization,
When an alert is stopped via speech, button press, or GUI affordance, the Alerts component should transition from the alert foreground state to the idle state.
If the Dialog channel becomes active while an alert is going off, your Alerts component should transition from the foreground alert state to the background alert state as long as the Dialog channel is active. When the Dialog channel becomes inactive, it should return to the foreground alert state until it is stopped/finished.
BACKGROUND ALERT: The Alerts component should only transition to the background alert state when the Dialog channel is active. For more information on channels and channel prioritization

Tuesday, 25 October 2016
Monday, 24 October 2016
Friday, 21 October 2016
This is for the speech synthesizer which include states like playing finished.
States
SpeechSynthesizer has the following states:
PLAYING: While Alexa is speaking, SpeechSynthesizer should be in a playing state. SpeechSynthesizer should transition to the finished state when playback of Alexa’s speech is complete.
FINISHED: When Alexa is finished speaking, SpeechSynthesizer should transition to the finished state following a SpeechFinished event.
So today i started with this part.
Thursday, 20 October 2016
Wednesday, 19 October 2016
Tuesday, 18 October 2016
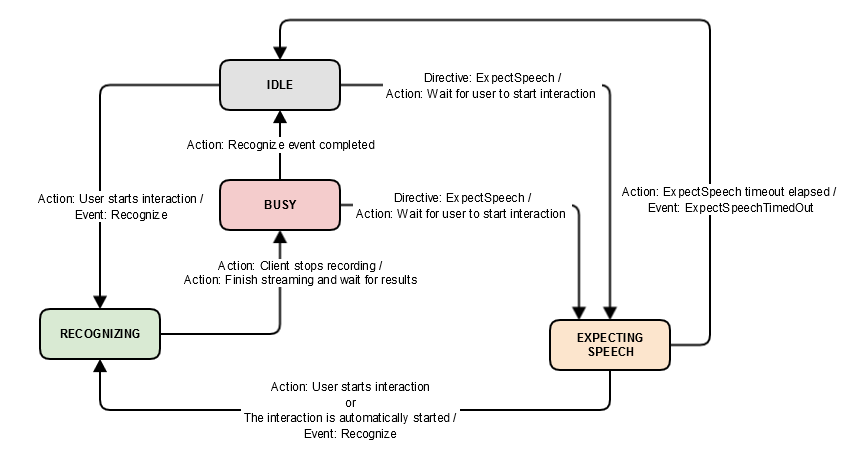
The following diagram illustrates state changes driven by SpeechRecognizer components. Boxes represent SpeechRecognizer states and the connectors indicate state transitions.
SpeechRecognizer has the following states:
IDLE: Prior to capturing user speech, SpeechRecognizer should be in an idle state. SpeechRecognizer should also return to an idle state after a speech interaction with AVS has concluded. This can occur when a speech request has been successfully processed or when an
ExpectSpeechTimedOut event has elapsed.
Additionally, SpeechRecognizer may return to an idle state during a multiturn interaction, at which point, if additional speech is required from the user, it should transition from the idle state to the expecting speech state without a user starting a new interaction.
RECOGNIZING: When a user begins interacting with your client, specifically when captured audio is streamed to AVS, SpeechRecognizer should transition from the idle state to the recognizing state. It should remain in the recognizing stateuntil the client stops recording speech (or streaming is complete), at which point your SpeechRecognizer component should transition from the recognizing state to the busy state.
BUSY: While processing the speech request, SpeechRecognizer should be in the busy state. You cannot start another speech request until the component transitions out of the busy state. From the busy state, SpeechRecognizer will transition to the idle state if the request is successfully processed (completed) or to the expecting speech state if Alexa requires additional speech input from the user.
EXPECTING SPEECH: SpeechRecognizer should be in the expecting speech state when additional audio input is required from a user. From expecting speech, SpeechRecognizer should transition to the recognizing state when a user interaction occurs or the interaction is automatically started on the user’s behalf. It should transition to the idle state if no user interaction is detected within the specified timeout window.
Monday, 17 October 2016
I understood what is the interaction model of alexa voice service. there are many things like events and directives and how it all work
Overview
A client interacting with the Alexa Voice Service will regularly encounter events/directives that produce competing audio. For instance, a user may ask a question while Alexa is speaking or a previously scheduled alarm may trigger while music is streaming. The rules that govern the prioritization and handling of these inputs and outputs are referred to as the interaction model. In the following sections we’ll cover:
- Interfaces, Directives and Events
- Client Interactions with the Alexa Voice Service
- Voice Request Lifecycle
- Channels
- Testing the Interaction Model
These were all the topics that were to be studied for the complete understanding of all of this.
Thursday, 13 October 2016
All the json data is to be parsed through a json parser i.e jsmn
jsmn (pronounced like ‘jasmine’) is a minimalistic JSON parser in C. It can be easily integrated into the resource-limited projects or embedded systems.it is a light weight parser used to give output the json data using Cthe work is to parse the json data through jsmn. jsmnn parser has 2 files jsmn.h and jsmn,c and thts it. It can be integreted into the code and it would not effect the code space or time building up.
jsmn (pronounced like ‘jasmine’) is a minimalistic JSON parser in C. It can be easily integrated into the resource-limited projects or embedded systems.it is a light weight parser used to give output the json data using Cthe work is to parse the json data through jsmn. jsmnn parser has 2 files jsmn.h and jsmn,c and thts it. It can be integreted into the code and it would not effect the code space or time building up.
Wednesday, 12 October 2016
The raspberry pi project is complete, now a new project based on alexa voice service was started today. there are certain interfacs on avs website such as speech interface, audio or speaker or system etc.. Inn all of them JSON format data is stored or retrieved.
So to start the project i started with JSON
SON (JavaScript Object Notation) is a lightweight data-interchange format. It is easy for humans to read and write. It is easy for machines to parse and generate. It is based on a subset of the JavaScript Programming Language, Standard ECMA-262 3rd Edition - December 1999. JSON is a text format that is completely language independent but uses conventions that are familiar to programmers of the C-family of languages, including C, C++, C#, Java, JavaScript, Perl, Python, and many others. These properties make JSON an ideal data-interchange language.
JSON is built on two structures:
- A collection of name/value pairs. In various languages, this is realized as an object, record, struct, dictionary, hash table, keyed list, or associative array.
- An ordered list of values. In most languages, this is realized as an array, vector, list, or sequence.
Tuesday, 11 October 2016
- Click the Start Listening button and wait for the audio cue before you begin to speak. It may take a second or two for the connection to be made before you hear the audio cue.
- Once you hear the audio cue, say What's the weather in Seattle? and wait. Alexa will send a
StopCapturedirective to the client when your intent is recognized. Then you will hear Alexa's response, which should be the current weather report for Seattle. - Click the Start Listening button and wait for the audio cue. Once you hear the cue, say "Set a timer for 5 seconds" and wait. You should receive a response from Alexa, which should be "5 seconds starting now." When 5 seconds have elapsed, the timer will go off. To stop the timer, press the play/pause button directly below Start Listening.
- The previous, play/pause, and next buttons demonstrate music button events. Music button events allow you to initiate changes in the playback stream without having to speak to Alexa. For example, you can press the play/pause button to pause and restart a track of music. To demonstrate the play/pause button, you can speak the following command: Play DC101 on iHeartRadio, then press the play/pause button. The music will pause in response to the button press. Press the play/pause button again to restart the music.
Monday, 10 October 2016
Friday, 7 October 2016
The following instructions will walk you through building and running the Node.js server for authentication. Looking to authenticate using a mobile app instead? See instructions for Android, and iOS.
NOTE: The server implementation does not use persistent storage; everything is stored in memory. Therefore, if you shut down the server, you will lose your tokens.
To run the server, follow these instructions:
- Open a command prompt.
- Change directories to
{REFERENCE_IMPLEMENTATION}/samples/companionService - To install dependencies, type:
npm install. - In a web browser, visit the Login with Amazon developer portal.
- Near the top of the page, select your security profile from the drop down menu and click Confirm.
- Enter a privacy policy URL beginning with
http://orhttps://. For this example, you can enter a fake URL such ashttp://example.com. Optionally, you can choose to upload an image, which will be shown on the Login with Amazon consent page. Click Save. - Next to Security Profile, click Show Client ID and Client Secret. This will display your client ID and client secret. Save these values.
- In your favorite text editor, open
{REFERENCE_IMPLEMENTATION}/samples/companionService/config.jsand edit the following values:clientId: Paste in your client ID as a string.clientSecret: Paste in your client secret as a string.products: The products object consists of a key that should be the same as the product ID (also referred to as Device Type ID) that you set up in the developer portal and an array of unique product identifiers. For this project, the array should be a single value, and match the serial number you entered while generating certificates.
- Save the
config.js. - From your command prompt, run the following:
npm start.
The server is running. You are now ready to run the sample app.
Wednesday, 5 October 2016
After all the stuff at amazon website, now the main work is of terminal.
- Download and install OpenSSL.
- Add the OpenSSL
binfolder to the Windows PATH (see environment variables). - Edit the
ssl.cnfconfiguration file with your favorite text editor. Replace any placeholder values that start withYOUR_.
Note:countryNamemust be two characters (e.g. US). If it is not two characters, certificate creation will fail. Additionally, if you will be accessing your device from any IP or DNS entry besides localhost (127.0.0.1 or 10.0.2.2), you must add the additional IP or or DNS entries to[alt_names]. One situation where you will need to add entries to[alt_names]is if you are going to authenticate using an Android or iOS companion app from a device instead of from the Android or iOS emulators on the same machine as the Node.js server and sample app. - Open a command prompt.
- Change directories to
{REFERENCE_IMPLEMENTATION}\samples\javaclient. - Type:
set OPENSSL_CONF={OpenSSL installation location}\bin\openssl.cfg. - Run the certificate generation script:
generate.bat. - During generation you will be prompted for some information (save this information -- you'll need it later):
- When prompted for a
productID, enter theproductID(or Device Type ID) listed under "Device Type Info" in the Amazon developer portal. - When prompted for a
serial number, enter your product's serial number. For prototyping purposes we recommend using: 123456. - When prompted for a
password, create a password (just don't forget it -- you'll need this soon). For prototyping purposes we recommend leaving password blank.
- When prompted for a
- Edit the configuration file for the Node.js server. The configuration file is located in
{REFERENCE_IMPLEMENTATION}\samples\companionService\config.js.- Set
sslKeyto{REFERENCE_IMPLEMENTATION}\\samples\\javaclient\\certs\\server\\node.key. - Set
sslCertto{REFERENCE_IMPLEMENTATION}\\samples\\javaclient\\certs\\server\\node.crt. - Set
sslCaCertto{REFERENCE_IMPLEMENTATION}\\samples\\javaclient\\certs\\ca\\ca.crt.
- Set
- Edit the configuration file for the sample app. The configuration file is located at
{REFERENCE_IMPLEMENTATION}\samples\javaclient\config.json.- Set
companionApp.sslKeyStoreto{REFERENCE_IMPLEMENTATION}\\samples\\javaclient\\certs\\server\\jetty.pkcs12. - Set
companionApp.sslKeyStorePassphraseto the password entered in the certificate generation script. - Set
companionService.sslClientKeyStoreto{REFERENCE_IMPLEMENTATION}\\samples\\javaclient\\certs\\client\\client.pkcs12. - Set
companionService.sslClientKeyStorePassphraseto the password entered in the certificate generation script. - Set
companionService.sslCaCertto{REFERENCE_IMPLEMENTATION}\\samples\\javaclient\\certs\\ca\\ca.crt.
- Set
Tuesday, 4 October 2016
Monday, 3 October 2016
After installing the dependencies, a sample app is to be downloaded from the amazon developer site which has the java client.
Now openssl is installed for the certificates and the key which will be used to connect to ALEXA.
Now openssl is installed for the certificates and the key which will be used to connect to ALEXA.
OpenSSL is an open source project that provides a robust, commercial-grade, and full-featured toolkit for the Transport Layer Security (TLS) and Secure Sockets Layer (SSL) protocols. It is also a general-purpose cryptography library. For more information about the team and community around the project, or to start making your own contributions, start with the community page. To get the latest news, download the source, and so on, please see the sidebar or the buttons at the top of every page.
The OpenSSL toolkit is licensed under an Apache-style license, which basically means that you are free to get and use it for commercial and non-commercial purposes subject to some simple license conditions.
Subscribe to:
Comments (Atom)