All the work is done and The project is finally ready to show in the college.Though It is not the complete project but at least I will be able to show it to them. I have some screenshots and sir gave me diferent modules of the project which have lwip and mbedtls integrated into the code. Though it cant connect to the serve but some outputs are shown.
Monday, 19 December 2016
Thursday, 15 December 2016
Wednesday, 14 December 2016
Tuesday, 13 December 2016
Monday, 12 December 2016
Thursday, 8 December 2016
Wednesday, 7 December 2016
Tuesday, 6 December 2016
Monday, 5 December 2016
Thursday, 1 December 2016
today it showed output which was intended to be the correct output but i had to go through all the output what functions it was calling and all so debugging all of it and seeing what functions were being called and it was a very complex part as inside a function there were more functions and more conditions and inside them there were again more functions.
Wednesday, 30 November 2016
Tuesday, 29 November 2016
Now both the functionalities are combined into the source code and its run but we got an error which i think is a big error because its giving us all the output as a garbage value.
there is some function in the code which is responsible for the protocol LWIP tcp/ip stack, which is putting some garbage in the output. So I had to see what it is about.
there is some function in the code which is responsible for the protocol LWIP tcp/ip stack, which is putting some garbage in the output. So I had to see what it is about.
Monday, 28 November 2016
Friday, 25 November 2016
Wednesday, 23 November 2016
Monday, 21 November 2016
Thursday, 17 November 2016
Tuesday, 15 November 2016
Monday, 14 November 2016
Friday, 11 November 2016
That combination work got completed now Sir asked me to implement it on the real device i.e through an IDE like system workbench on the board STM 32 f767. I had all the tools installed in my PC but Sir wanted it on an another PC. So all the tools were to be installed on an other PC.
So all the cycle starts again.
So all the cycle starts again.
Thursday, 10 November 2016
All the interfaces are done. Now I had to combine all these in 1 file as all were being executed separately, now all had to be executed from one main file. So all had to be executed from one file and one main function so what I did was I put them in one switch statement and made cases for all.
#include <stdio.h>

int main () {

   /* local variable definition */
   char grade = 'B';

   switch(grade) {
      case 'A' :
         printf("Excellent!\n" );
         break;
      case 'B' :
      case 'C' :
         printf("Well done\n" );
         break;
      case 'D' :
         printf("You passed\n" );
         break;
      case 'F' :
         printf("Better try again\n" );
         break;
      default :
         printf("Invalid grade\n" );
   }

   printf("Your grade is  %c\n", grade );

   return 0;
}
Tuesday, 8 November 2016
Monday, 7 November 2016
The Speaker interface exposes directives and events that are used to adjust volume and mute/unmute a client’s speaker. Alexa supports two methods for volume adjustment, which are exposed through the
SetVolume and AdjustVolumedirectives.Friday, 4 November 2016
Wednesday, 2 November 2016
The following diagram illustrates state changes driven by AudioPlayer components. Boxes represent AudioPlayer states and the connectors indicate state transitions.
AudioPlayer has the following states:
IDLE: AudioPlayer is only in an idle state when a product is initially powered on or rebooted and prior to acting on a
Playdirective.
PLAYING: When your client initiates playback of an audio stream, AudioPlayer should transition from an idle state to playing.
If you receive a directive instructing your client to perform an action, such as pausing or stopping the audio stream, if the client has trouble buffering the stream, or if playback fails, AudioPlayer should transition to the appropriate state when the action is performed (and send an event to AVS). Otherwise, AudioPlayer should remain in the playing state until the current stream has finished.
Additionally, AudioPlayer should remain in the playing state when:
- Reporting playback progress to AVS
- Sending stream metadata to AVS
STOPPED: There are four instances when AudioPlayer should transition to the stopped state. While in the playing state, AudioPlayer should transition to stopped when:
- An issue with the stream is encountered and playback fails
- The client receives a
Stopdirective from AVS - A
ClearQueuedirective with aclearBehaviorofCLEAR_ALLis received - A
Playdirective with aplayBehaviorofREPLACE_ALLis received
While in the paused or buffer_underrun states, AudioPlayer should transition to stopped when a
ClearQueue directive to CLEAR_ALL is received.
AudioPlayer should transition from stopped to playing whenever your client receives a
Play directive, starts playing an audio stream, and sends a PlaybackStarted event to the AVS.
PAUSED: AudioPlayer should transition to the paused state when audio on the Content channel is paused to accommodate a higher priority input/output (such as user or Alexa speech). Playback should resume when the prioritized activity completes. For more information on prioritizing audio input/outputs, see Interaction Model.
BUFFER_UNDERRUN: AudioPlayer should transition to the buffer_underrun state when the client is being fed data slower than it is being read. AudioPlayer should remain in this state until the buffer is full enough to resume playback, at which point it should return to the playing state.
FINISHED: When a stream is finished playing, AudioPlayer should transition to the finished state. This is true for every stream in your playback queue. Even if there are streams queued to play, your client is required to send a
PlaybackFinished event to AVS, and subsequently, transition from the playing state to finished when each stream is finished playing.
AudioPlayer should transition from finished to playing when:
- The client receives a
Playdirective - The next stream in the playback queue starts playing (following a
PlaybackStartedevent).

Tuesday, 1 November 2016
Monday, 31 October 2016
Thursday, 27 October 2016
Wednesday, 26 October 2016
Overview
The Alerts Interface exposes directives and events that are used to set, manage and cancel timers and alarms. While AVS sends directives to your client to set and manage timers and alarms, ultimately, your client must implement the logic necessary to manage timers and alarms if internet connectivity is lost or if the on-product clock is out of sync with NTP.
This document covers the following topics:
- Alerts State Diagram
- Alerts Directives and Events
State Diagram
The following diagram illustrates state changes driven by the Alerts component. Boxes represent Alerts states and connectors indicate transitions.
Alerts supports the following states:
IDLE: Prior to a previously set alert going off, the Alerts component should be in the idle state. Alerts should also return to an idle state once an alert is stopped/finished. This can occur as the result of user speech, a physical button press, or GUI affordance.
FOREGROUND ALERT: Assuming an on-client alert has already been set, Alerts should transition from the idle state to the alert foreground state when an alert starts and the AlertStarted event is sent to the Alexa Voice Service.
This is only true if the Alerts channel is in the foreground, which implies the Dialog channel is inactive. For more information on channels and channel prioritization,
When an alert is stopped via speech, button press, or GUI affordance, the Alerts component should transition from the alert foreground state to the idle state.
If the Dialog channel becomes active while an alert is going off, your Alerts component should transition from the foreground alert state to the background alert state as long as the Dialog channel is active. When the Dialog channel becomes inactive, it should return to the foreground alert state until it is stopped/finished.
BACKGROUND ALERT: The Alerts component should only transition to the background alert state when the Dialog channel is active. For more information on channels and channel prioritization

Tuesday, 25 October 2016
Monday, 24 October 2016
Friday, 21 October 2016
This is for the speech synthesizer which include states like playing finished.
States
SpeechSynthesizer has the following states:
PLAYING: While Alexa is speaking, SpeechSynthesizer should be in a playing state. SpeechSynthesizer should transition to the finished state when playback of Alexa’s speech is complete.
FINISHED: When Alexa is finished speaking, SpeechSynthesizer should transition to the finished state following a SpeechFinished event.
So today i started with this part.
Thursday, 20 October 2016
Wednesday, 19 October 2016
Tuesday, 18 October 2016
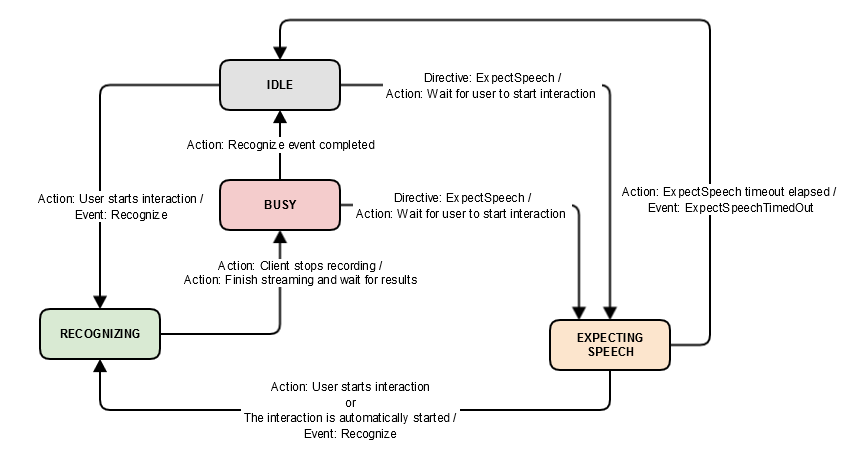
The following diagram illustrates state changes driven by SpeechRecognizer components. Boxes represent SpeechRecognizer states and the connectors indicate state transitions.
SpeechRecognizer has the following states:
IDLE: Prior to capturing user speech, SpeechRecognizer should be in an idle state. SpeechRecognizer should also return to an idle state after a speech interaction with AVS has concluded. This can occur when a speech request has been successfully processed or when an
ExpectSpeechTimedOut event has elapsed.
Additionally, SpeechRecognizer may return to an idle state during a multiturn interaction, at which point, if additional speech is required from the user, it should transition from the idle state to the expecting speech state without a user starting a new interaction.
RECOGNIZING: When a user begins interacting with your client, specifically when captured audio is streamed to AVS, SpeechRecognizer should transition from the idle state to the recognizing state. It should remain in the recognizing stateuntil the client stops recording speech (or streaming is complete), at which point your SpeechRecognizer component should transition from the recognizing state to the busy state.
BUSY: While processing the speech request, SpeechRecognizer should be in the busy state. You cannot start another speech request until the component transitions out of the busy state. From the busy state, SpeechRecognizer will transition to the idle state if the request is successfully processed (completed) or to the expecting speech state if Alexa requires additional speech input from the user.
EXPECTING SPEECH: SpeechRecognizer should be in the expecting speech state when additional audio input is required from a user. From expecting speech, SpeechRecognizer should transition to the recognizing state when a user interaction occurs or the interaction is automatically started on the user’s behalf. It should transition to the idle state if no user interaction is detected within the specified timeout window.
Monday, 17 October 2016
I understood what is the interaction model of alexa voice service. there are many things like events and directives and how it all work
Overview
A client interacting with the Alexa Voice Service will regularly encounter events/directives that produce competing audio. For instance, a user may ask a question while Alexa is speaking or a previously scheduled alarm may trigger while music is streaming. The rules that govern the prioritization and handling of these inputs and outputs are referred to as the interaction model. In the following sections we’ll cover:
- Interfaces, Directives and Events
- Client Interactions with the Alexa Voice Service
- Voice Request Lifecycle
- Channels
- Testing the Interaction Model
These were all the topics that were to be studied for the complete understanding of all of this.
Thursday, 13 October 2016
All the json data is to be parsed through a json parser i.e jsmn
jsmn (pronounced like ‘jasmine’) is a minimalistic JSON parser in C. It can be easily integrated into the resource-limited projects or embedded systems.it is a light weight parser used to give output the json data using Cthe work is to parse the json data through jsmn. jsmnn parser has 2 files jsmn.h and jsmn,c and thts it. It can be integreted into the code and it would not effect the code space or time building up.
jsmn (pronounced like ‘jasmine’) is a minimalistic JSON parser in C. It can be easily integrated into the resource-limited projects or embedded systems.it is a light weight parser used to give output the json data using Cthe work is to parse the json data through jsmn. jsmnn parser has 2 files jsmn.h and jsmn,c and thts it. It can be integreted into the code and it would not effect the code space or time building up.
Wednesday, 12 October 2016
The raspberry pi project is complete, now a new project based on alexa voice service was started today. there are certain interfacs on avs website such as speech interface, audio or speaker or system etc.. Inn all of them JSON format data is stored or retrieved.
So to start the project i started with JSON
SON (JavaScript Object Notation) is a lightweight data-interchange format. It is easy for humans to read and write. It is easy for machines to parse and generate. It is based on a subset of the JavaScript Programming Language, Standard ECMA-262 3rd Edition - December 1999. JSON is a text format that is completely language independent but uses conventions that are familiar to programmers of the C-family of languages, including C, C++, C#, Java, JavaScript, Perl, Python, and many others. These properties make JSON an ideal data-interchange language.
JSON is built on two structures:
- A collection of name/value pairs. In various languages, this is realized as an object, record, struct, dictionary, hash table, keyed list, or associative array.
- An ordered list of values. In most languages, this is realized as an array, vector, list, or sequence.
Tuesday, 11 October 2016
- Click the Start Listening button and wait for the audio cue before you begin to speak. It may take a second or two for the connection to be made before you hear the audio cue.
- Once you hear the audio cue, say What's the weather in Seattle? and wait. Alexa will send a
StopCapturedirective to the client when your intent is recognized. Then you will hear Alexa's response, which should be the current weather report for Seattle. - Click the Start Listening button and wait for the audio cue. Once you hear the cue, say "Set a timer for 5 seconds" and wait. You should receive a response from Alexa, which should be "5 seconds starting now." When 5 seconds have elapsed, the timer will go off. To stop the timer, press the play/pause button directly below Start Listening.
- The previous, play/pause, and next buttons demonstrate music button events. Music button events allow you to initiate changes in the playback stream without having to speak to Alexa. For example, you can press the play/pause button to pause and restart a track of music. To demonstrate the play/pause button, you can speak the following command: Play DC101 on iHeartRadio, then press the play/pause button. The music will pause in response to the button press. Press the play/pause button again to restart the music.
Monday, 10 October 2016
Friday, 7 October 2016
The following instructions will walk you through building and running the Node.js server for authentication. Looking to authenticate using a mobile app instead? See instructions for Android, and iOS.
NOTE: The server implementation does not use persistent storage; everything is stored in memory. Therefore, if you shut down the server, you will lose your tokens.
To run the server, follow these instructions:
- Open a command prompt.
- Change directories to
{REFERENCE_IMPLEMENTATION}/samples/companionService - To install dependencies, type:
npm install. - In a web browser, visit the Login with Amazon developer portal.
- Near the top of the page, select your security profile from the drop down menu and click Confirm.
- Enter a privacy policy URL beginning with
http://orhttps://. For this example, you can enter a fake URL such ashttp://example.com. Optionally, you can choose to upload an image, which will be shown on the Login with Amazon consent page. Click Save. - Next to Security Profile, click Show Client ID and Client Secret. This will display your client ID and client secret. Save these values.
- In your favorite text editor, open
{REFERENCE_IMPLEMENTATION}/samples/companionService/config.jsand edit the following values:clientId: Paste in your client ID as a string.clientSecret: Paste in your client secret as a string.products: The products object consists of a key that should be the same as the product ID (also referred to as Device Type ID) that you set up in the developer portal and an array of unique product identifiers. For this project, the array should be a single value, and match the serial number you entered while generating certificates.
- Save the
config.js. - From your command prompt, run the following:
npm start.
The server is running. You are now ready to run the sample app.
Wednesday, 5 October 2016
After all the stuff at amazon website, now the main work is of terminal.
- Download and install OpenSSL.
- Add the OpenSSL
binfolder to the Windows PATH (see environment variables). - Edit the
ssl.cnfconfiguration file with your favorite text editor. Replace any placeholder values that start withYOUR_.
Note:countryNamemust be two characters (e.g. US). If it is not two characters, certificate creation will fail. Additionally, if you will be accessing your device from any IP or DNS entry besides localhost (127.0.0.1 or 10.0.2.2), you must add the additional IP or or DNS entries to[alt_names]. One situation where you will need to add entries to[alt_names]is if you are going to authenticate using an Android or iOS companion app from a device instead of from the Android or iOS emulators on the same machine as the Node.js server and sample app. - Open a command prompt.
- Change directories to
{REFERENCE_IMPLEMENTATION}\samples\javaclient. - Type:
set OPENSSL_CONF={OpenSSL installation location}\bin\openssl.cfg. - Run the certificate generation script:
generate.bat. - During generation you will be prompted for some information (save this information -- you'll need it later):
- When prompted for a
productID, enter theproductID(or Device Type ID) listed under "Device Type Info" in the Amazon developer portal. - When prompted for a
serial number, enter your product's serial number. For prototyping purposes we recommend using: 123456. - When prompted for a
password, create a password (just don't forget it -- you'll need this soon). For prototyping purposes we recommend leaving password blank.
- When prompted for a
- Edit the configuration file for the Node.js server. The configuration file is located in
{REFERENCE_IMPLEMENTATION}\samples\companionService\config.js.- Set
sslKeyto{REFERENCE_IMPLEMENTATION}\\samples\\javaclient\\certs\\server\\node.key. - Set
sslCertto{REFERENCE_IMPLEMENTATION}\\samples\\javaclient\\certs\\server\\node.crt. - Set
sslCaCertto{REFERENCE_IMPLEMENTATION}\\samples\\javaclient\\certs\\ca\\ca.crt.
- Set
- Edit the configuration file for the sample app. The configuration file is located at
{REFERENCE_IMPLEMENTATION}\samples\javaclient\config.json.- Set
companionApp.sslKeyStoreto{REFERENCE_IMPLEMENTATION}\\samples\\javaclient\\certs\\server\\jetty.pkcs12. - Set
companionApp.sslKeyStorePassphraseto the password entered in the certificate generation script. - Set
companionService.sslClientKeyStoreto{REFERENCE_IMPLEMENTATION}\\samples\\javaclient\\certs\\client\\client.pkcs12. - Set
companionService.sslClientKeyStorePassphraseto the password entered in the certificate generation script. - Set
companionService.sslCaCertto{REFERENCE_IMPLEMENTATION}\\samples\\javaclient\\certs\\ca\\ca.crt.
- Set
Tuesday, 4 October 2016
Monday, 3 October 2016
After installing the dependencies, a sample app is to be downloaded from the amazon developer site which has the java client.
Now openssl is installed for the certificates and the key which will be used to connect to ALEXA.
Now openssl is installed for the certificates and the key which will be used to connect to ALEXA.
OpenSSL is an open source project that provides a robust, commercial-grade, and full-featured toolkit for the Transport Layer Security (TLS) and Secure Sockets Layer (SSL) protocols. It is also a general-purpose cryptography library. For more information about the team and community around the project, or to start making your own contributions, start with the community page. To get the latest news, download the source, and so on, please see the sidebar or the buttons at the top of every page.
The OpenSSL toolkit is licensed under an Apache-style license, which basically means that you are free to get and use it for commercial and non-commercial purposes subject to some simple license conditions.
Friday, 30 September 2016
raspberry pi is loaded with SD card which contains NOOBS software. This software is used to load raspbien jessie into the pi, which serves as an operating system. after being loaded it has a browser, a file system and all the other features which are in a normal computer system but in a small version.
all the commands are run through terminal where we have to make sure that all is run as the root user.
next there are some dependencies which are to be installed for the working of this project.
vlc media player
nodejs
vnc server
etc..
they are not installed so easily but the installation comes with so many errors which are so difficult to resolve.
Wednesday, 28 September 2016
our main aim is to work around alexa voice service. so in my internship there are going to be 2 projects centered on this technology.
today i started with first one. one with raspberry pi.
The Raspberry Pi is a series of credit card-sized single-board computers developed in the United Kingdom by the Raspberry Pi Foundation to promote the teaching of basic computer science in schools and developing countries.
you just connect it with hdmi monitor and it works like a normal computer.
Alexa Voice Service (AVS) is Amazon’s intelligent voice recognition and natural language understanding service that allows you as a developer to voice-enable any connected device that has a microphone and speaker.
- Raspberry Pi 3 (Recommended) or Pi 2 Model B (Supported)
- Micro-USB power cable for Raspberry Pi.
- Micro SD Card (Minimum 8 GB) - You need an operating system to get started. NOOBS (New Out of the Box Software) is an easy-to-use operating system install manager for Raspberry Pi. The simplest way to get NOOBS is to buy an SD card with NOOBS pre-installed - Alternatively, you can download and install it on your SD card
- USB 2.0 Mini Microphone - Raspberry Pi does not have a built-in microphone; to interact with Alexa you'll need an external one to plug in
- External Speaker with 3.5mm audio cable -
- A USB Keyboard & Mouse, and an external HDMI Monitor - we also recommend having a USB keyboard and mouse as well as an HDMI monitor handy if you're unable to rinto your Pi.
- Internet connection (Ethernet or WiFi)
Tuesday, 27 September 2016
Friday, 23 September 2016
Thursday, 22 September 2016
atlast today I got one blog which installed cURL on the system and nghttp and cURL do somewhat of same thing and need almost same dependencies. Infact in the installation of cURL nghttp is also installed.
so in cygwin, first openssl is installed then we need libev and many other softwares. all were to be installed through cygwin.
so in cygwin, first openssl is installed then we need libev and many other softwares. all were to be installed through cygwin.
In computer networking, OpenSSL is a software library to be used in applications that need to secure communications against eavesdropping or need to ascertain the identity of the party at the other end. It has found wide use in internet web servers, serving a majority of all web sites.
OpenSSL contains an open-source implementation of the SSL and TLS protocols. The core library, written in the C programming language, implements basic cryptographic functions and provides various utility functions. Wrappers allowing the use of the OpenSSL library in a variety of computer languages are available.
Versions are available for most Unix and Unix-like operating systems (including Solaris, Linux, Mac OS X and the various open-source BSD operating systems), OpenVMS and Microsoft Windows. IBM provides a port for the System i(OS/400).
openssl takes musch time to build and install.
Wednesday, 21 September 2016
Monday, 19 September 2016
After trying at home for the client, server I told sir it is not working we have to see some other option.
The other options which was available in documentation is building nghttp through cygwin.
The other options which was available in documentation is building nghttp through cygwin.
Notes for building on Windows (Mingw/Cygwin)
Under Mingw environment, you can only compile the library, it's
libnghttp2-X.dll and libnghttp2.a.
If you want to compile the applications(
h2load, nghttp, nghttpx, nghttpd), you need to use the Cygwin environment.
Under Cygwin environment, to compile the applications you need to compile and install the libev first.
Secondly, you need to undefine the macro
__STRICT_ANSI__, if you not, the functions fdopen, filenoand strptime will not available.Friday, 16 September 2016
I succeeded with building nghttp through MSVC on windows. But we didnt get what we wanted. we needed to get the applications i.e nghttp client, server and proxy programs which were no available after building it.
So we searched through internet what are the available options that we have to do for getting those applications.
Thursday, 15 September 2016
Now after installing all dependencies, which weer required in building nghttp/2. main point came for building it on windows.
the steps were given on the website
the steps were given on the website
Building from git
$ autoreconf -i
$ automake
$ autoconf
$ ./configure
$ make
Notes for building on Windows (MSVC)
$ autoreconf -i
$ automake
$ autoconf
$ ./configure
$ make
Notes for building on Windows (MSVC)
- Install cmake for windows
- Open "Visual C++ ... Native Build Tool Command Prompt", and inside nghttp2 directly, run
cmake.
- Then run
cmake --buildto build library.
- nghttp2.dll, nghttp2.lib, nghttp2.exp are placed under lib directory.
Building from git is easy, but please be sure that at least autoconf 2.68 is used:
To compile the source code, gcc >= 4.8.3 or clang >= 3.4 is required.
Note
To enable mruby support in nghttpx, run
git submodule update --init before running configure script, and use --with-mruby configure option.
Note
Mac OS X users may need the
--disable-threads configure option to disable multi-threading in nghttpd, nghttpx and h2load to prevent them from crashing. A patch is welcome to make multi threading work on Mac OS X platform.
Note
To compile the associated applications (nghttp, nghttpd, nghttpx and h2load), you must use the
--enable-app configure option and ensure that the specified requirements above are met. Normally, configure script checks required dependencies to build these applications, and enable --enable-app automatically, so you don't have to use it explicitly. But if you found that applications were not built, then using --enable-app may find that cause, such as the missing dependency.
The easiest way to build native Windows nghttp2 dll is use cmake. The free version of Visual C++ Build Tools works fine.
Note that the above steps most likely produce nghttp2 library only. No bundled applications are compiled.
Wednesday, 14 September 2016
The following package is required to build the libnghttp2 library:
- pkg-config >= 0.20
To build and run the unit test programs, the following package is required:
- cunit >= 2.1
To build the documentation, you need to install:
- sphinx (http://sphinx-doc.org/)
If you need libnghttp2 (C library) only, then the above packages are all you need. Use
--enable-lib-only to ensure that only libnghttp2 is built. This avoids potential build error related to building bundled applications.
To build and run the application programs (
nghttp, nghttpd, nghttpx and h2load) in the srcdirectory, the following packages are required:- OpenSSL >= 1.0.1
- libev >= 4.11
- zlib >= 1.2.3
ALPN support requires OpenSSL >= 1.0.2 (released 22 January 2015). LibreSSL >= 2.2.0 can be used instead of OpenSSL, but OpenSSL has more features than LibreSSL at the time of this writing.
To enable the SPDY protocol in the application program
nghttpx and h2load, the following package is required:- spdylay >= 1.3.2
To enable
-a option (getting linked assets from the downloaded resource) in nghttp, the following package is required:- libxml2 >= 2.7.7
The HPACK tools require the following package:
- jansson >= 2.5
To build sources under the examples directory, libevent is required:
- libevent-openssl >= 2.0.8
To mitigate heap fragmentation in long running server programs (
nghttpd and nghttpx), jemalloc is recommended:- jemalloc
libnghttp2_asio C++ library requires the following packages:
- libboost-dev >= 1.54.0
- libboost-thread-dev >= 1.54.0
The Python bindings require the following packages:
- cython >= 0.19
- python >= 2.7
- python-setuptools
Subscribe to:
Comments (Atom)